If your patient needs new teeth, implant overdentures are an excellent option for the edentulous population. They look and function better than conventional dentures, slow bone loss, and enjoy long-term success.
We look at what implant overdentures are, the types of overdentures available, when to prescribe them and what to consider when you do, and the complete overdenture process using digital workflow for the overdenture steps.
What are overdentures?
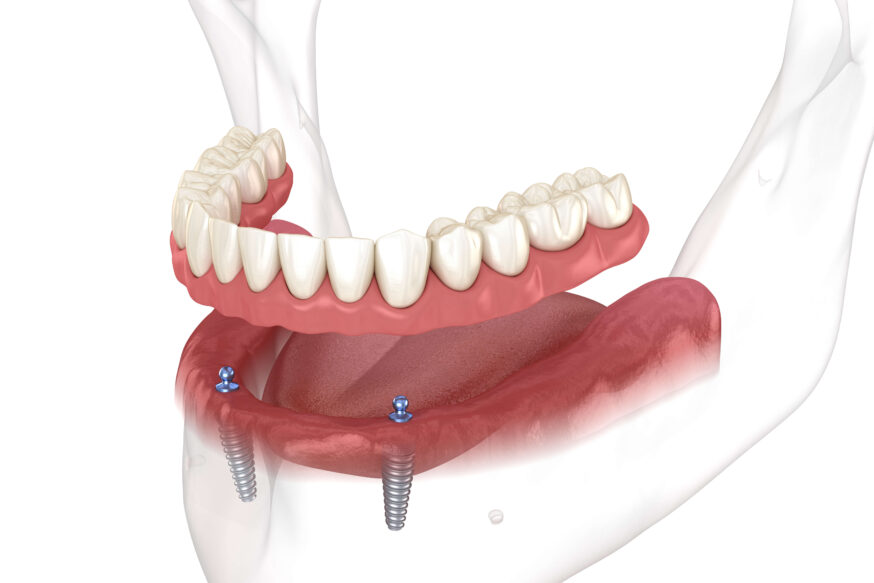
Overdentures are similar to regular dentures in that they replace several missing teeth, are removable, and patients can eat with them. However, unlike conventional dentures that rest on the patient’s gums, an implant overdenture is secured with dental implants into the jawbone.
Patients with implant overdentures enjoy improved oral function and esthetics over traditional dentures, while also restoring the natural form and function of their teeth and supporting structures. For example, research indicates that the chewing efficiency of individuals with natural dentition is 90%. Patients with overdentures came in at 79%, while complete denture wearers only enjoyed 59%. Moreover, patients with implant overdentures are associated with reduced alveolar bone resorption and have demonstrated long-term success, maintaining effectiveness for five to ten years.
Types of overdentures
There are a few different kinds of overdentures, which vary by how one puts on the overdenture. These include:
- Removable implant-supported dentures: These are designed to securely attach to dental implants in the patient’s jawbone using a snap-on mechanism. They stay in place until patients remove them. This option allows for easy daily removal, making cleaning a hassle-free process.
- Fixed implant-supported dentures: Also known as hybrid dentures, fixed implant-supported dentures attach permanently to implants in the jawbone. Patients cannot remove them at home, but their dentist can remove them when needed. This type requires regular brushing and flossing underneath using floss threaders, interproximal brushes, and other specialized cleaning tools.
- Bar-Retained Implant-Supported Overdentures: The bar-retained implant-supported overdenture attaches a bar to the implants, allowing the denture to clip securely in place. This design allows easy removal and insertion, usually for cleaning or sleeping.
- Ball-Retained Implant-Supported Overdentures: These overdentures use ball-shaped supports that connect the implants to the denture. These ball attachments simplify cleaning and allow for easy replacement of parts if necessary.
- Implant-Retained Removable Partial Denture: Using implants and remaining natural teeth, these overdentures lessen the inconveniences of conventional removable partial dentures without requiring ugly clasps in the esthetic zone. With a flange added, clinicians can replace facial esthetics and extraoral soft tissue support lost from advanced ridge resorption. These appliances need minimal modification when adding prosthetic teeth and can serve as a transitional appliance that allows for additional surgical procedures.
When to prescribe overdentures
Overdentures are an alternative for patients who struggle with conventional dentures. They also benefit patients with altered oral anatomy, neuromuscular disorders, pronounced gag reflexes, or significant ridge resorption.
An appropriate attachment system selection depends on several factors, categorized into patient-related and dentist-related considerations. Patient factors include the amount of available bone in each jaw, the patient’s expectations regarding the prosthetic outcome, and whether they can afford it. Dentist factors are personal preferences and clinical expertise. Additional factors include the experience and technical knowledge of the lab technicians involved.
There are other considerations, too. For example, minimizing the attachment height is also important to reduce the space required inside the denture, which reduces the risk of fractures from inadequate acrylic thickness. Whether to use housings with replaceable matrices is another essential concern.
Moreover, implant-related factors affect in the patient selection process. These include the location of the implants, the number of implants placed, their length, and the percentage of surface area surrounded by bone. These elements also collectively influence the attachment system choice to ensure the most suitable and successful outcome.
Implant overdenture steps
Producing overdentures using conventional methods can require from four to 10 appointments, with as many as 14 days between them to coordinate with the lab for each step. It can take two to three hours of clinical time and run up a significant lab bill for hundreds of dollars. By contrast, using a digital workflow for your overdenture steps saves time and money and improves the patient experience. Experts agree a digital workflow simplifies the fabrication process and the number of clinical appointments required to deliver the prosthesis. Moreover, the data captured by a digital workflow produces an equal or, in some cases, superior prosthesis.
Following are the digital workflow implant overdenture steps.
Appointment 1: Take impressions
Capturing the arches is a critical part of the overdenture scanning process. Before scanning, ensure the healing caps or abutments are clean and dry, and the field is clear of debris.
If you are replacing an overdenture or converting an immediate denture, adjust the existing denture (if needed) before scanning. Then, using light body wash, seat the denture while having the patient move their lips and tongue from side to side and apply gentle pressure to it, then wait for the impression material to set. If there is significant wear to the existing denture, use blue mousse to fill the bite onto the occlusal.
After removing and cleaning any excess material from the existing prosthesis, get a 360 scan of the reference denture or dentures. In single-arch cases, get a scan of the opposing, too.
Appointment 2: Register bite
For cases where the patient does not have an existing overdenture to ascertain the vertical dimension of occlusion (VDO), use a Wax Bite Rim to capture the bite. Light body wash on the wax rim helps capture the border molding and improves accuracy. Be sure to mark the wax bite rim with the smile lines, canine lines, and midlines. The added blue mousse will get the bite. Then, get a 360 extraoral scan of the wax bite rim.
When taking a bite digitally in single arch overdenture or immediate denture replacement cases, register the bite using the intraoral bite scan (from molar to the midline) with blue mousse. For dual arch cases, record the bite by scanning both arches in occlusion extraorally (from molar to molar) with blue mousse.
In addition, take photos. First, take a head-on photo with the patient smiling naturally with the wax bite rim in place, followed by a second version of the head-on photo plus cheek retractors. Lastly, take a profile dental picture from each side with the patient smiling naturally and the wax rim in place.
Appointment 3: Placement and adjustment
Careful evaluation of base fit, extensions, and occlusion is critical in this step. Clinicians should also pay attention to patient comfort, invest time in post-insertion instructions, and set proper patient expectations.
Regarding denture fit and base extensions, determine if any areas of contact need relief. Then, verify that the stress-bearing area of the maxilla is the crest of the alveolar ridge with pressure distributed evenly bilaterally, that the mandible has the primary stress distributed to the buccal shelf, and that adjustment to the bilateral contacts here does not need adjustment.
Also, ensure no overextensions exist in the denture base by using the material to identify them while patients move the overdenture in functional movements. Check the base thickness for whether it needs adjusting to support tissues appropriately.
Once adjustments are complete, check esthetics and occlusion. In particular, occlusion should have stable, bilateral contact in the centric position.
Then, to place overdenture, put auto-polymerizing material inside denture reliefs and then seat, having the patient close into the bite. After polymerization is complete (use a timer or put a bit of the material on the glove to help you gauge completion), check for voids around the abutments and place additional material as needed, not getting it inside them. Then, clean up excess with a carbide bur on the inside or lingual areas and polish as required. Regarding excess material, consider drilling lingual exhaust vents for it to connect into relief holes.
Post placement considerations
For follow-up, continue monitoring all the metrics for fit, function, and comfort, and evaluate the healing process for the patient’s soft and hard tissue. Adjust any areas causing problems for the oral cavity or the patient’s function. In some cases, a resilient relining material might need replacing (if used at the placement and adjustment appointment) as the soft tissues might shrink as they heal. Check these areas at each subsequent appointment.
Also, checking in with the patient regarding their handling of the prosthetic is essential. Additionally, check in about the patient experience, particularly their satisfaction with the restorations. It’s not uncommon for patients to determine they would instead switch to a fixed appliance after experiencing a removable one.
Final notes on implant overdentures
Overdentures provide edentulous patients with an improved experience over conventional dentures that provides a better approximation to the efficiency and function of their natural teeth. Getting patients prepped for successful implant overdentures starts with a proper case selection and attachment type.
The traditional overdenture steps can be time-consuming and expensive. By following these digital workflow overdenture steps, you can set the overdenture process up for its best possible outcome, which can deliver an excellent prosthetic in fewer appointments—giving you and the patient plenty to smile about.
Please contact the team at Dandy with questions about the overdenture process or overdenture steps, or click here to learn about our many restorative services.
Sources:
Implant Supported Dentures: Process, Benefits & Care (2022). Available at: https://my.clevelandclinic.org/health/treatments/24303-implant-supported-dentures (Accessed: 20 July 2023).
Implant Overdentures, Introduction, Placement, and Post-Placement. Available at: https://www.for.org/en/treat/treatment-guidelines/edentulous/treatment-options/implant-prosthetics-removable/implant-overdenture-overview/implant-overdentures-introduction (Accessed: 20 July 2023).
Implant Overdenture – A Review to Highlight the Concept (2020). Available at: https://www.heraldopenaccess.us/openaccess/implant-overdenture-a-review-to-highlight-the-concept (Accessed: 20 July 2023).
An, X. et al. (2020) “Digital workflow for fabricating an overdenture by using an implant surgical template and intraoral scanner”, The Journal of Prosthetic Dentistry, 123(5), pp. 675-679. doi: 10.1016/j.prosdent.2019.04.022.
5 Types of Overdentures – Procedure, Pros, Cons, & Costs (2021). Available at: https://www.newmouth.com/dentistry/restorative/dentures/overdenture/ (Accessed: 20 July 2023).
AEGIS Communications, D. (2008) Expanding the Benefits of Implant Therapy: Implant-Retained Removable Partial Dentures, Aegisdentalnetwork.com. Available at: https://www.aegisdentalnetwork.com/special-issues/2008/07/implant-retained-removable-partial-dentures (Accessed: 20 July 2023).
Implant CE Article – Implant-supported overdentures (2023). Available at: https://implantpracticeus.com/ce-articles/implant-supported-overdentures/ (Accessed: 20 July 2023).
Sherer, DMD, MS, M. Intraoral Scanning, 3D Printing and Milling Workflows for Overdentures (2019) Available at: https://www.michaelschererdmd.com/wp-content/uploads/2020/12/SchererMD-Digital-Implant-Overdentures-Compendium-eBook.pdf (Accessed: 25 July 2023).


